 GoSuda
使用 Redis 客户端缓存提升响应性

什么是 Redis?
我想大多数人都对 Redis 并不陌生。不过,为了简要回顾,我们可以将其特性整理如下。
- 操作在单线程中执行,因此所有操作都具有原子性。
- 数据存储并计算于In-Memory之中,因此所有操作都很快速。
- Redis 可根据配置保存 WAL,从而能够快速地对最新状态进行备份和恢复。
- 支持 Set、Hash、Bit、List 等多种数据类型,因此具有较高的生产力。
- 拥有庞大的社区,可以共享各种经验、问题及解决方法。
- 经过长期的开发与运营,具有值得信赖的稳定性。
言归正传
试想一下?
假如您的服务缓存符合以下两个条件,情况会怎样呢?
- 需要向用户提供频繁被查询的数据的最新状态,但由于更新不规律,必须频繁地更新缓存时
- 数据不再更新,但需要频繁访问并查询同一缓存数据时
第一种情况可以考虑购物商城的实时热门排名。将购物商城的实时热门排名保存为 sorted set 时,若每当用户访问主页都要从 Redis 读取,则效率低下。第二种情况是汇率数据:尽管汇率大约每 10 分钟公布一次,但实际查询却非常频繁。其中,对于韩元-美元、韩元-日元、韩元-人民币,缓存的查询尤为频繁。在这些情况下,较为高效的做法是让 API 服务器在本地保存单独的缓存,并在数据发生变化时重新查询 Redis 以进行更新。
那么,如何才能在 数据库 - Redis - API 服务器 的架构中实现这样的操作呢??
用 Redis PubSub 不行吗?
使用缓存时,订阅一个可以接收更新通知的频道吧!
- 那么就需要编写在更新时发送消息的逻辑。
- 由于 PubSub 会带来额外的操作,因此会影响性能。
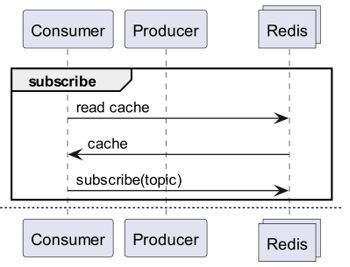
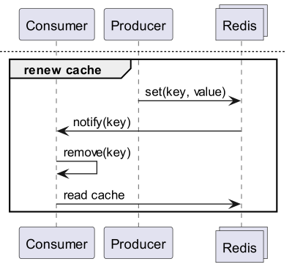
那如果由 Redis 来感知变更呢?
如果使用 Keyspace Notification,接收针对该键的命令通知会怎样?
- 需要预先保存并共享用于更新的键及命令,较为麻烦。
- 例如,某些键的更新命令是单纯的 Set,而另一些键的更新命令则是 LPush、RPush,或 SAdd 及 SRem,情况变得复杂。
- 这会大幅增加开发过程中沟通失误和编码中人为错误的可能性。
如果使用 Keyevent Notification,按命令单位接收通知会怎样?
- 需要订阅所有用于更新的命令,并对其中传入的键进行适当过滤。
- 例如,在通过 Del 传入的所有键中,有一部分对该客户端而言很可能并不存在本地缓存。
- 这可能导致不必要的资源浪费。
因此,我们需要的是 Invalidation Message!
Invalidation Message 是什么?
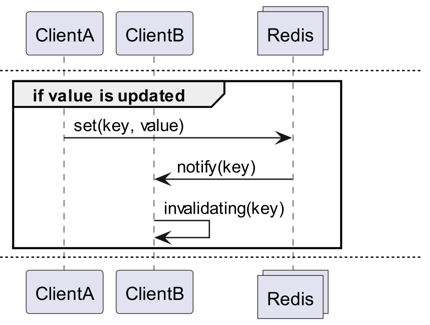
Invalidation Messages 是作为 Redis 6.0 新增的 Server Assisted Client-Side Cache 的一部分而提供的概念。Invalidation Message 按以下流程传递。
- 假设 ClientB 已经读取过一次该 key。
- ClientA 重新设置该 key。
- Redis 检测到变更,并向 ClientB 发布 Invalidation Message,通知 ClientB 清除缓存。
- ClientB 接收该消息,并采取相应的措施。
该如何使用
基本运行结构
连接到 Redis 的客户端执行 CLIENT TRACKING ON REDIRECT <client-id>,即可接收 invalidation message。而需要接收消息的客户端则通过 SUBSCRIBE __redis__:invalidate 订阅 invalidation message。
default tracking
1# client 1
2> SET a 100
1# client 3
2> CLIENT ID
312
4> SUBSCRIBE __redis__:invalidate
51) "subscribe"
62) "__redis__:invalidate"
73) (integer) 1
1# client 2
2> CLIENT TRACKING ON REDIRECT 12
3> GET a # tracking
1# client 1
2> SET a 200
1# client 3
21) "message"
32) "__redis__:invalidate"
43) 1) "a"
broadcasting tracking
1# client 3
2> CLIENT ID
312
4> SUBSCRIBE __redis__:invalidate
51) "subscribe"
62) "__redis__:invalidate"
73) (integer) 1
1# client 2
2CLIENT TRACKING ON BCAST PREFIX cache: REDIRECT 12
1# client 1
2> SET cache:name "Alice"
3> SET cache:age 26
1# client 3
21) "message"
32) "__redis__:invalidate"
43) 1) "cache:name"
51) "message"
62) "__redis__:invalidate"
73) 1) "cache:age"
实现!实现!实现!
Redigo + Ristretto
仅仅这样说明,在实际代码中该如何使用仍然有些含糊。因此,我们先用 redigo 和 ristretto 简单地搭建一个示例。
首先安装这两个依赖。
github.com/gomodule/redigogithub.com/dgraph-io/ristretto
 1package main
 2
 3import (
 4	"context"
 5	"fmt"
 6	"log/slog"
 7	"time"
 8
 9	"github.com/dgraph-io/ristretto"
10	"github.com/gomodule/redigo/redis"
11)
12
13type RedisClient struct {
14	conn  redis.Conn
15	cache *ristretto.Cache[string, any]
16	addr  string
17}
18
19func NewRedisClient(addr string) (*RedisClient, error) {
20	cache, err := ristretto.NewCache(&ristretto.Config[string, any]{
21		NumCounters: 1e7,     // 用于跟踪键访问频率的键数量 (10M)。
22		MaxCost:     1 << 30, // 缓存的最大成本 (1GB)。
23		BufferItems: 64,      // 每个 Get 缓冲区的键数量。
24	})
25	if err != nil {
26		return nil, fmt.Errorf("failed to generate cache: %w", err)
27	}
28
29	conn, err := redis.Dial("tcp", addr)
30	if err != nil {
31		return nil, fmt.Errorf("failed to connect to redis: %w", err)
32	}
33
34	return &RedisClient{
35		conn:  conn,
36		cache: cache,
37		addr:  addr,
38	}, nil
39}
40
41func (r *RedisClient) Close() error {
42	err := r.conn.Close()
43	if err != nil {
44		return fmt.Errorf("failed to close redis connection: %w", err)
45	}
46
47	return nil
48}
首先,我们创建一个包含 ristretto 和 redigo 的简单 RedisClient。
 1func (r *RedisClient) Tracking(ctx context.Context) error {
 2	psc, err := redis.Dial("tcp", r.addr)
 3	if err != nil {
 4		return fmt.Errorf("failed to connect to redis: %w", err)
 5	}
 6
 7	clientId, err := redis.Int64(psc.Do("CLIENT", "ID"))
 8	if err != nil {
 9		return fmt.Errorf("failed to get client id: %w", err)
10	}
11	slog.Info("client id", "id", clientId)
12
13	subscriptionResult, err := redis.String(r.conn.Do("CLIENT", "TRACKING", "ON", "REDIRECT", clientId))
14	if err != nil {
15		return fmt.Errorf("failed to enable tracking: %w", err)
16	}
17	slog.Info("subscription result", "result", subscriptionResult)
18
19	if err := psc.Send("SUBSCRIBE", "__redis__:invalidate"); err != nil {
20		return fmt.Errorf("failed to subscribe: %w", err)
21	}
22	psc.Flush()
23
24	for {
25		msg, err := psc.Receive()
26		if err != nil {
27			return fmt.Errorf("failed to receive message: %w", err)
28		}
29
30		switch msg := msg.(type) {
31		case redis.Message:
32			slog.Info("received message", "channel", msg.Channel, "data", msg.Data)
33			key := string(msg.Data)
34			r.cache.Del(key)
35		case redis.Subscription:
36			slog.Info("subscription", "kind", msg.Kind, "channel", msg.Channel, "count", msg.Count)
37		case error:
38			return fmt.Errorf("error: %w", msg)
39		case []interface{}:
40			if len(msg) != 3 || string(msg[0].([]byte)) != "message" || string(msg[1].([]byte)) != "__redis__:invalidate" {
41				slog.Warn("unexpected message", "message", msg)
42				continue
43			}
44
45			contents := msg[2].([]interface{})
46			keys := make([]string, len(contents))
47			for i, key := range contents {
48				keys[i] = string(key.([]byte))
49				r.cache.Del(keys[i])
50			}
51			slog.Info("received invalidation message", "keys", keys)
52		default:
53			slog.Warn("unexpected message", "type", fmt.Sprintf("%T", msg))
54		}
55	}
56}
代码稍显复杂。
- 为了进行 Tracking,我们再建立一个连接。这是考虑到 PubSub 可能会干扰其他操作而采取的措施。
- 查询新增连接的 ID,使查询数据的连接将 Tracking 重定向到该连接。
- 然后订阅 invalidation message。
- 处理订阅的代码略显复杂。由于 redigo 无法解析失效消息,因此需要在解析之前接收响应并进行处理。
 1func (r *RedisClient) Get(key string) (any, error) {
 2	val, found := r.cache.Get(key)
 3	if found {
 4		switch v := val.(type) {
 5		case int64:
 6			slog.Info("cache hit", "key", key)
 7			return v, nil
 8		default:
 9			slog.Warn("unexpected type", "type", fmt.Sprintf("%T", v))
10		}
11	}
12	slog.Info("cache miss", "key", key)
13
14	val, err := redis.Int64(r.conn.Do("GET", key))
15	if err != nil {
16		return nil, fmt.Errorf("failed to get key: %w", err)
17	}
18
19	r.cache.SetWithTTL(key, val, 1, 10*time.Second)
20	return val, nil
21}
Get 方法如下所示,先查询 ristretto,如果没有,则从 Redis 中获取。
 1package main
 2
 3import (
 4	"context"
 5	"log/slog"
 6	"os"
 7	"os/signal"
 8	"time"
 9)
10
11func main() {
12	ctx, cancel := signal.NotifyContext(context.Background(), os.Interrupt)
13	defer cancel()
14
15	client, err := NewRedisClient("localhost:6379")
16	if err != nil {
17		panic(err)
18	}
19	defer client.Close()
20
21	go func() {
22		if err := client.Tracking(ctx); err != nil {
23			slog.Error("failed to track invalidation message", "error", err)
24		}
25	}()
26
27	ticker := time.NewTicker(1 * time.Second)
28	defer ticker.Stop()
29	done := ctx.Done()
30
31	for {
32		select {
33		case <-done:
34			slog.Info("shutting down")
35			return
36		case <-ticker.C:
37			v, err := client.Get("key")
38			if err != nil {
39				slog.Error("failed to get key", "error", err)
40				return
41			}
42			slog.Info("got key", "value", v)
43		}
44	}
45}
用于测试的代码如上所示。若您实际运行一下,就会发现每当 Redis 中的数据被更新时,值都会随之刷新。
但这种方式过于复杂。最重要的是,为了扩展到集群环境,必然需要对所有主节点或副本节点启用 Tracking。
Rueidis
既然使用 Go 语言,我们便有了最现代且发展成熟的 rueidis。接下来,我们编写一段在使用 rueidis 的 Redis 集群环境中,使用 server assisted client side cache 的代码。
首先,安装依赖。
github.com/redis/rueidis
然后编写从 Redis 查询数据的代码。
 1package main
 2
 3import (
 4	"context"
 5	"log/slog"
 6	"os"
 7	"os/signal"
 8	"time"
 9
10	"github.com/redis/rueidis"
11)
12
13func main() {
14	ctx, cancel := signal.NotifyContext(context.Background(), os.Interrupt)
15	defer cancel()
16
17	client, err := rueidis.NewClient(rueidis.ClientOption{
18		InitAddress: []string{"localhost:6379"},
19	})
20	if err != nil {
21		panic(err)
22	}
23
24	ticker := time.NewTicker(1 * time.Second)
25	defer ticker.Stop()
26	done := ctx.Done()
27
28	for {
29		select {
30		case <-done:
31			slog.Info("shutting down")
32			return
33		case <-ticker.C:
34			const key = "key"
35			resp := client.DoCache(ctx, client.B().Get().Key(key).Cache(), 10*time.Second) // 本地缓存的保留时长
36			if resp.Error() != nil {
37				slog.Error("failed to get key", "error", resp.Error())
38				continue
39			}
40			i, err := resp.AsInt64()
41			if err != nil {
42				slog.Error("failed to convert response to int64", "error", err)
43				continue
44			}
45			switch resp.IsCacheHit() {
46			case true:
47				slog.Info("cache hit", "key", key)
48			case false:
49				slog.Info("missed key", "key", key)
50			}
51			slog.Info("got key", "value", i)
52		}
53	}
54}
要使用 rueidis 的客户端缓存,只需调用 DoCache。然后,像指定本地缓存的保留时长那样将数据加入本地缓存;再次调用相同的 DoCache 时,便会从本地缓存中查询并获取数据。理所当然地,它也能正确处理失效消息。
为什么不用 redis-go?
遗憾的是,redis-go 并未通过官方 API 支持 server assisted client side cache。甚至在创建 PubSub 时新建连接,却没有直接访问该连接的 API,因此也无法获知 client id。基于此,我们判断 redis-go 无法完成此类配置,于是放弃了它。
很性感嘛
通过 client side cache 结构
- 如果是可以预先准备的数据,通过这种结构可以将对 Redis 的查询和流量降至最低,同时始终提供最新的数据。
- 借此可以构建一种 CQRS 结构,从而大幅提升读取性能。

变得有多性感?
实际上,现场正好在使用这种结构,因此我们对两个 API 进行了简单的延迟测量。恳请谅解,只能以非常抽象的方式进行描述。
- 第一个 API
- 首次查询时:平均 14.63ms
- 之后查询时:平均 2.82ms
- 平均差距:10.98ms
- 第二个 API
- 首次查询时:平均 14.05ms
- 之后查询时:平均 1.60ms
- 平均差距:11.57ms
延迟最多改善了约 82%!
我们预计可能带来了以下改进。
- 省去客户端与 Redis 之间的网络通信过程,并节约流量
- 减少 Redis 本身需要执行的读取命令数量
- 这也具有提升写入性能的效果。
- 尽量减少对 Redis 协议的解析
- 解析 Redis 协议也并非零成本。能够减少这部分开销是一个很大的机会。
但所有事物都是权衡取舍。为此,我们至少牺牲了以下两点。
- 需要实现、运维和维护客户端缓存管理要素
- 由此导致客户端的 CPU 和内存使用量增加
结论
就个人而言,这是一个令人满意的架构组成部分,延迟以及对 API 服务器的压力也都非常小。今后,如果可能,我仍希望以这种结构来构建架构。